Redes Sociales

jueves, 13 de mayo de 2021

4 new vulns finally published

Today, a number of vulnerabilities that a friend of mine (Aaron Flecha ) and myself found more than three years ago have been finally published as vulnerbilities in the US CERT. The vulnerabilities are the following:

Sitel CAP/PRX is an small and simple RTU (Remote Telecontrol Unit) based on Linux and developed by SITEL which had a big lack of security measures. A number of vulnerabilities were discovered in this device (here only four are mentioned). These vulnerabilities were pointed out to the manufacturer, who took note and changed completely the device.

The resolution of these vulnerabilities by the manufacturer were sometimes... mainly mitigations of the problem. But the vulnerabilities are not there any longer, so they can be considered to be resolved.

As the responsability of these link belong only to INCIBE CERT and these kind of link tend to disappear with time, I will add 4 screenshots in order to maintain access to them:

Explanation of the vulnerabilities


CVE-2021-32453- sitel RTU CAP/PRX - information exposure

Severity: 6.5

It's possible to access via Web (using the insecure protocolo HTTP) to the internal configuration database of the device (which was actually a .xml file) without any kind of authentication by just knowing the XML file URL. Knowing this, an ttacker could access the whole device configuration.

It's also possible to access different configuration files stored in the device through the insecure protocol HTTP and without any kind of authentication using the following URL:

               http:///cgi-bin/display 

When accessing this URL the contents of the following list of configuration files were shown:

  • /etc/password
  • /etc/group
  • /proc/cpuinfo

All these files provide information about the device and its operative system, allowing attacker to plan more harmful attacks.

Solution: The Manufacturer was contacted and they prepared a new firmware version (v5.3.09). CAP/PRX owners should update their


CVE-2021-32454- sitel RTU CAP/PRX - Hardcoded credentials

Severity: 9.6

The device used a well known (explained in manuals) hardcoded password. Although it's hardcoded in the ushell executable, and shouldn't be modified, an attacker with access to the device, could modify the ushell executable and leave legitimate users without access to the device. Moreover, to recover the device the legitimate owner would need to access physically to the device and update its firmware.

Solution: The Manufacturer was contacted and they prepared a new firmware version (v5.3.09).


CVE-2021-32455- sitel RTU CAP/PRX - Denial of service attack

Severity: 6.8

It was possible to provoke a denial of service of the whole system by sending massively HTTP requests. The reason is because these HTTP connections were not properly closed, and this provoked, after a period of time, a denial of service of the embedded web server. In a worst-case scenario the whole system would become stuck and it would be necessary to reboot the system.

Solution: The Manufacturer was contacted and they prepared a new firmware version (v5.3.09).

CVE-2021-32455- sitel RTU CAP/PRX - Cleartext transmission of sensitive information

Severity: 5.7

The authentication process of legitimate users to the SITEL CAP/PRX web panel was performed using the insecure protocol HTTP. For this reason, web panel access credentials went in plaintext. An attacker with access to the local network of the device or the device user's computer could obtain, through a MITM attack these authentication passwords by simple analyzing the network traffic.

Solution: The Manufacturer was contacted and they prepared a new firmware version (v5.3.09).

domingo, 19 de enero de 2020

Malmod

From the 1st of February of 2016 to 31st January 2017 I embarked in a exciting project at the university of Leon, in Spain, aimed to find vulnerabilities in the different devices we, the group, found in the industrial lab the university had prepared for us. There we found many many devices ready to be investigated:

  • Tofino firewalls
  • Scheneider Electric PLCs
  • Siemens PLCs
  • Opto22 PLCs
  • ...

I soon found I was using a PLC that didn't seem to be very safe. It was the Modicon M340 PLC. From that point, I started to try to understand how the communications of this device worked and how could I attack it.

For a couple of months this was my work. First I understood that Schneider Electric used a modified version of Modbus for communication named UMAS, that has been described in these series of posts (here, here, here, here and here).

Then I found a vulnerability related to this UMAS private protocol that is described here.

Some interesting reports were written (like this)

Even an academic paper was published partially explained what we had found. This one.

But some work from that year has not yet been published. And this is work are the scripts and libraries developed for testing the PLCs and trying the attacks.

This set of scripts were named MALMOD and a series of python script that uses scapy for communicating with the Modicon M340 PLC without the necessity of the official Unity libraries.

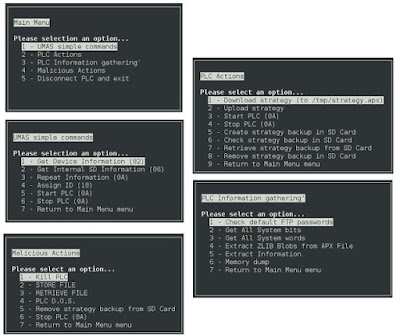
These scripts are a group of functions that try different "attacks" against del Modicon M340 PLC. Among the attacks that can be tried are:

  • Try default FTP passwords
  • Write blocks of rubbish in the PLCs memory
  • Obtain information of any kind
    • Get all system bits
    • Get all system words
    • Monitor all system bits
    • Extract general PLC information
    • Extract network information
    • Extract zlib blobs from snmp
  • Store file in holding registers
  • Recover file from holding registers
  • stop PLC remotely
  • delete backup strategy

Other additional non-malicious functions:

  • Upload strategy
  • Download strategy
  • Get Card Information
  • Check if PLC is running
  • start PLC
  • Set PLC Date
  • Set PLC Time
  • Get PLC Date and Time

This script are conformed by the following files:

  • malmod.py : Starting point. Will launch a screen menu based on CURSES that will allow do different operations against a PLC. The script can also be run without CURSES menu. The script options are:
                    usage: malmod.py [-h] [-v|-w] -m  [-u |-d |-i|-c|-a|-b|-x|-y|-k|-l|-L|-f|-n]
                                    -h: this help text
                                    -m : PLC IP address
                    MODIFIERS:
                                    -v | --verbose: verbose output
                                    -w | --very-verbose: very verbose output
                    ACTIONS:
                                    --upload-strategy | -u : ATX file to upload
                                    --download-strategy | -d : Path to ATX file to download strategy in
                                    --get-info | -i: Get Device Information
                                    -s: Get Card Information
                                    --store-file | -a : Store File in Holding registers
                                    --retrieve-file | -b : Retrieve File in Holding registers
                                    --command-file | -c : Command File (Only in listener mode)
                                    --listener-mode | -l: Listener Mode
                                    --ncurses | -n: use curses interface
                                    --restore-backup | -R: Restore strategy from backup
                                    --delete-backup | -D: Delete backup of strategy from card
                                    --backup | -B: Backup styrategy into card
                                    --start | -y: Start PLC
                                    -x: Check if PLC is Running (with -v)
                                    --stop | -z: Stop PLC
                                    --kill-plc | -k: Stop PLC
                                    -f: Try default FTP passwords
                                    --set-date=
    --set-time= --get-time: return time of PLC
  • umas.py : Includes a pseudo-library for interacting with the Modicon M-340 using the UMAS library
  • mal_functions.py: Includes a set of malicious functions that can be used against a Modicon M340 PLC
  • modbus.py: Very bad chosen name for a set of auxiliary functions used by the rest of scripts to work. This file include functions like ione that opens and maintain it open a port the PLC can interact with, among others
  • cliente_modbus.py: Python script for doing normal modbus requests against the modicon PLC. This does not use UMAS

The scripts are provided as they are. I don't even know if they work (I don't have a Modicon M340 at home and have not tested them), but I guess they should as they worked at the lab. Documentation is not very good either not to mention my style of coding which has improved very much since then.

There's only one attack that has NOT been added and it's the one that leveraged the vulnerability I found in the PLC.

Malmod can be found at https://github.com/mliras/malmod/. I hope you enjoy it.

jueves, 26 de septiembre de 2019

Secure coding master degree presentations

For the last three years I've been giving a trimestral course on secure coding at the University of León, in Spain. The course based on secure coding for C, Java and a little bit of PHP. The following is the content list of materias explored on the course:

  • Lesson 1.- Buffer overflows
  • Lesson 2.- System Memory and memory corruption
  • Lesson 2bis.- Strings
  • Lesson 3.- Formatted Output
  • Lesson 4.- Os protections
  • Lesson 5.- Introduction to assembly
  • Lesson 5bis.- Introduction to exploiting
  • Lesson 6.- Coding concurrency problems
  • Lesson 7.- Secure coding on File System access
  • Lesson 8.- Secure coding on OO programming (Methods)
  • Lesson 9.- Web secure coding with PHP (Part I)
  • Lesson 10.-Web secure coding with PHP (Part II)

The course included to practical classes which versed on "Introduction to exploiting". The course included three assignments in which the students were asked to explin the functioning of current real vulnerability and associate it to any of the subjects that were being given at class, in another, they were asked to exploit a simple program and exploit bwapp.

I will include next some links to PDFs that were given at class:

Source code for exploiting exercises (although very simple) are included next:

...BTW pdfs are NOT malicious, ;-P just confirm it at virustotal.com

miércoles, 20 de febrero de 2019

Setting up splunk for HP printers

Splunk is one of the most well-known SIEMs. Many companies use it to gather security information all around the company/corporation to determine possible attacks and/or security breaches.

HP Printers, although with an increasing level of security are still weak enough to be a substancial target for adversaries willing to break into the company's network.

Configuring Splunk to gather Syslog information from HP printers is not as straight-forward task as expected. Although HP printers can set up syslog through their embedded web server, syslog messages do NOT have the standard syslog structure. HP printers syslog format is based on a code and then a message, removing other standard information like timestamp, device or severity.

Actually all of them goes encoded in the HP syslog messages but they need to be decoded in order any SIEM to understand these syslog messages.

The standard syslog message has the following format:

%timestamp% %source ip% %severity level%: %device%: %message%

...or any glavour of this format. See https://tools.ietf.org/html/rfc5424

However the HP printers syslog message has the following format:

%< internal_code >% %device%: %message% %optional_fields%

As it can be seen some standard information (timestamp, source_ip) is missing. This missing information is optionally sent through the optional fields. In this way, the message continue with fields like "time=20-02-2019..." or "ip=12.23.34.45".

However standard SIEMs are NOT prepared for this syslog format and need some preprocessing before gathering them.

The HP printer Splunk App

Splunk provides an app (or plugin) that gathers HP printer's information. Its name is “HP Printer Security” and it can be found at https://splunkbase.splunk.com/app/3588/.

To obtain this app it's necessary to register in the splunkbase website and log in.Once done:

  1. Log into Splunk Enterprise.
  2. On the Apps menu, click Manage Apps.
  3. Click Install app from file.
  4. In the Upload app window, click Choose File.
  5. Locate the .tar.gz file you just downloaded, and then click Open or Choose.
  6. Click Upload.
  7. Click Restart Splunk, and then confirm that you want to restart.

The new app appears in the left hand side of the web interface.

A short read to this plugin's README file let's us understand it's NOT an official plugin. It instead was developed by a group of students.

Reading a little bit more, we find that the plgin actually reads a syslog file (In /etc/apps/data/hp_gen_log.log) and looks for lines with the standard syslog format:

%timestamp% %source ip% %severity level%: %device%: %message%

...like:

e.g. 2016-12-06T17:54:25.324722+08:00 172.20.134.251 LPR.INFO: printer: peripheral low-power state.

This expected format has nothing to do with the standard HP printers syslog format.

Fixing the problem

So we need to make splunk understand that the HP printer logs comes with a different format. There are two ways to accomplish this. You can either install a syslog server so that syslog messages are copied into a local file with the appropriate format. Or you can configure splunk to convert syslog message and introduce them in the splunk database directly with the appropriate format.

The first workaround means installing syslog-ng and configuring it so that the syslog messages are save to file with a different format. This is NOT explained in this post.

The second workaround means modifying the HP printer plugin & splunk configuration to accept syslog message directly from the network interface.

Setting up splunk

To make this app work with LFP printers, it’s necessary to modify three files in the /etc/system/local directory. First we’ll need to identify the new fields to be added to the printersec database. We’ll have to modify %splunk%/etc/system/local/fields.conf adding the following lines:

[code]
INDEXED=TRUE
[severity]
INDEXED=TRUE
[severity_val]
INDEXED=TRUE
[device]
INDEXED=TRUE

Then, in file %splunk%/etc/system/local/transforms.conf , we’ll calculate the values of these fields. Append the following lines into this field:

[eval1]
INGEST_EVAL=code=replace(substr(_raw,1,4),"([<>])","")

[eval2]
INGEST_EVAL=severity_val=code%8

[eval3]
INGEST_EVAL=severity=case(severity_val == "1", "LPR.ALERT", severity_val == "2", "LPR.CRITICAL", severity_val == "3", "LPR.ERROR", severity_val == "4", "LPR.WARNING", severity_val == "5", "LPR.NOTICE", severity_val == "6", "LPR.INFORMATIONAL")

[eval4]
INGEST_EVAL=device=mvindex(split(mvindex(split(_raw,":"),0)," "),1)

[eval5]
INGEST_EVAL=sourcetype="hp_printer_syslog"

Note: eval5 section could not be necessary if you were able to configure sourcetype as “hp_printer_syslog”.

The third file to modify is %splunk%/etc/system/local/props.conf. Here we tell splunk “please, use the sections I added in transforms.conf file”. To do this append the following lines to props.conf:

[linux_messages_syslog]
TRANSFORMS= eval1, eval2, eval3, eval4, eval5

Now it’s necessary to restart splunk in order to charge the file modifications. This is different in every case. In linux:

 
%splunk%/bin/splunk restart

In windows go to Control Panel --> Administrative tools --> Services --> Locate splunk service --> Restart

In order to avoid splunk reading the test values from a file, go to %splunk%/etc/apps/printersec/default/inputs.conf and remove the sections related to file hp_print_gen.log.

Next you need to clean all test data included with the HP Printer plugin. To do this open splunk and go to Settings --> Monitoring Console and, in the Search box write:

index=”printersec” | delete

Now you can start gathering syslog information from your HP printers.

The following will be how the HP Printer plugin for Splunk will show:

martes, 19 de febrero de 2019

About UEFI and BIOS

UEFI is a much needed replacement for legacy BIOS setups. As for how it works – that’s going to take a bit longer to explain. There are quite a few advantages that UEFI has over BIOS setups, as well as some potential problems to consider.

To understand UEFI it’s helpful to have a solid grasp on BIOS. We’ll begin with a brief look at how a BIOS functions, and then move into UEFI.

BIOS>

When we turn on a computer we hit the power button, the BIOS program, stored in non-volatile (traditionally read only) memory is accessed. When a computer powers on, it begins by executing at memory address 0xffff0 – the end of the BIOS. Its first responsibility is the POST – Power On Self Test. This is where the BIOS accesses things like memory, I/O devices (think keyboard, monitor, mouse) and checks that everything works properly. It also performs a memory test to determine the RAM available, sets memory and disk drive parameters, configures any plug and play devices (PCIe, USB) and assigns interrupt requests and direct memory addressing. Last but not least it identifies a boot device, one of potentially several partitions flagged as bootable, looks at the boot sector (MBR) and loads it into memory.

Now the BIOS proceeds to check each device in it’s specified order for a bootable device. If one if found it provides a jump instruction to 0x7C00. The MBR contains our first stage boot loader, disk signature, and partition table. The BIOS transfers control to the start of MBR, which then scans for a Volume Boot Record on the specified partition. Keeping it simple, this loads code that loads a second stage boot loader (like NTLDR) which then finally loads the operating system.

To make it simple, BIOS checks for essential hardware, looks for bootable devices, loads a bootstrapper into memory, which calls on a boot loader to start the operating system. What’s the deal with all these steps? Well our BIOS setup lacked the ability to load any more than that first 512 MB block. So we needed this multi-stage process to get things up and running. Kind of a mess right? Well UEFI solved that.

Some of the limitations we faced with BIOS/MBR setups were a maximum of 4 primary partitions, and a 2.2 TB size limit on partitions. Of course we can have plenty of logical partitions if we choose, but remember primary partitions are the only bootable partitions as far as Windows is concerned. Though Linux is perfectly happy booting from one (so long as it’s not a dynamic disk anyways). The partition size limit didn’t matter as much in the past, but now we can pick up a 6 TB Hard Disk Drive with prices dropping over time.

We know how BIOS works now and see its shortcomings. Now let’s look at UEFI.

UEFI Explained

UEFI stands for Unified Extensible Firmware Interface, and it is the replacement for BIOS. Along with UEFI comes GPT partitioning to replace MBR setup. Together they added quite a few features, but before we get into that, let’s look at how a computer works with UEFI.

UEFI does not rely on a boot sector like our old friend BIOS. In most cases the old MBR sector does still exist for backwards compatibility. You may hear talk of “disabling UEFI” to use older discs/OS’s – this is incorrect. UEFI is in fact always enabled (as it is your firmware) and all that’s happening is UEFI is supporting a legacy boot method. So, on to the boot process!

When the UEFI computer is turned on, it uses what’s called a boot manager to look at the current boot configuration. In other words, it checks to see which operating system to boot first. It then loads that operating system and executes the necessary code to get it started up. Much simpler. We skip the extra steps of our multi-stage boot loaders and just boot right from the firmware!

UEFI Advantages

There are quite a few advantages to our new UEFI setups, so let’s take a look. MBR type partitioning limits you to 4 primary partitions. GPT can handle a theoretically infinite amount. Though Windows “limits” you to 128. On top of that we can now have much larger partitions. Instead of being limited to 2.2 TB, we can now have up to 9.4 ZB!

With UEFI you also sometimes get a fancy graphical interface for a firmware menu. Gone are the days of the 1990’s looking computer screen (well…in some of them anyways). Now we might be looking at a stylish point and click user interface. This can be good since it makes life easier for the end user. This is bad because it makes changing things you shouldn’t a little easier. End users might be more inclined to explore their systems BIOS (I feel for you, help desk folks).

UEFI presents a simplified boot process that makes for shorter OS load times. With Windows 8+, if you enable fast boot it loads so quickly you can’t get to your firmware configuration screen the traditional way unless you disable fast boot (Shift + restart will take you there if need be though).

UEFI also stores a copy of the partition table in a secondary location. If your partition table becomes corrupted, you aren’t going to flip your desk over and denounce computers. There are a few other advantages like the demise of 16-bit real mode, but that requires diving in deeper than we need.

UEFI Disadvantages

UEFI made pretty great changes, but it’s not all sunshine and blue skies. We did not address secure boot in the advantages section. Secure boot stops any operating system from booting that is not signed by a key which is embedded into the UEFI firmware. This can prevent things such as root kits. That’s fantastic. Malicious boot loaders will now have a much much harder time getting onto systems. However, there’s a problem. OEM manufacturers have the possibility of locking customers out of this system and thereby preventing them from installing another operating system.

Secure boot is a fantastic idea and a potential advantage, so long as it is left in the hands of the customer.You can’t boot via anything that you have not given your blessing while secure boot is on. The only reason for placing secure boot under disadvantages is because of the potential for abuse.

Another downside is UEFI’s use of the FAT32 standard for EFI partitions. This adds a lot of overhead to a system that doesn’t really need it. We’ve got 32 bit pointer-sectors for partitions that only need to load an operating system. That seems a bit excessive to me.

Lastly, UEFI still doesn’t fix one of the problems of our old BIOS/MBR setups. We still have to re-probe for devices once the operating system loads. It would be nice if there was a way to pass that information from the POST onto the Kernel to skip a step and move straight to device initialization.

Conclusions in the UEFI vs Legacy BIOS Boot Debate

UEFI isn’t quite too complicated. It has its ups and downs, but from my perspective it seems like there is more to love than hate. As long as OEMs don’t take away the user’s control over secure boot, I’m perfectly content with this newer system. UEFI seems like it’s here to stay. Love or hate it, but if you’re a computer person, hopefully you understand how it works now.

For more information check out this post on UEFI and Legacy BIOS from our intern program. It gets into the differences in coding for each system, hardware compatibility, and more.

viernes, 4 de enero de 2019

Scraping tor web services

In the world of cybersecurity sometimes it's useful to navigate through the deep web looking for infamous malware you would never find in the clear web. Sometimes you find interesting repositories of malware you want to download completely. As we are talking about malware, it's important to keep as much away as possible from the samples. I would never use Windows systems to access them and even on Linux I prefer to work from command line. However if you want to scrape a whole TOR webservice from command line it's not always easy.

Looking in internet for any way to do this (scrape a tor web service) take you to programming forums where they recommend using haskell, curl, python, php... That was not my point. I wanted a linux tool to clone the web service to locally. httrack is fine for that, but I always used it from a Windows UI. In this case I was connecting to my server via SSH. On the other hand, it's a onion service so, somehow I needed it to understand .onion addresses.

All this could be resolved very easily with:

# apt install tor

This installs a bundle of tools like torify or torsocks that allow the system to understand onion addresses.

# apt install httrack

...httrack for Linux can be launched from command line...

# torsocks httrack http://iec56w4ibovnb4w.onion

This downloaded the whole onion tor service (as it was a very simple unauthenticated service) to my local host.

Hope it helps!.

miércoles, 12 de diciembre de 2018

Notes on symmetric and assymetric encryption and hashing algorithms

In the following weeks I will start working more deeply with OPENSSL and the different encryption algorithms used. This is a summary of most existing encryption and hashing algorithms. It's based on the notes by Rakhesh Sasidharan.

Symmetric key algorithms (Private key cryptography)

Explanation:Both parties share a private key (kept secret between them). Symmetric key algorithms are what you use for encryption. For example: encryption of traffic between a server and client, as well as encryption of data on a disk.

  • DES – Data Encryption Standard – designed at IBM. DES is a standard. The actual algorithm used is also called DES or sometimes DEA (Digital Encryption Algorithm). DES is now considered insecure (mainly due to a small key size of 56-bits). DES is a block cipher.
    • Triple DES (3DES) applies the DES algorithm thrice and thus has better practical security. It has 3 keys of 56-bits each (applied to each pass of DES/ DEA).
    • DES-X is another variant.
  • IDEA – International Data Encryption Algorithm. Considered to be a good and secure algorithm. Patented but free for non-commercial use. IDEA is a block cipher.
  • AES – Advanced Encryption Standard – is the successor to DES. AES is based on the Rijndael cipher. There was a competition to choose the cipher that will become the AES. The Rijndael cipher won the competition. However, there are some differences between Rijndael and its implementation in AES. Most CPUs now include hardware AES support making it very fast. AES and Rjindael are block ciphers. AES can operate in many modes.
    • AES-GCM (AES operating in Galois/Counter Mode (GCM)) is preferred (check this blog post too). It is fast and secure and works similar to stream ciphers. Can achieve high speeds on low hardware too. Only supported on TLS 1.2 and above.
    • AES-CBC is what older clients commonly use. AES-CBC mode is susceptible to attacks such as Lucky13 and BEAST.
  • Blowfish – designed by Bruce Schneier as an alternative to DES; no issues so far, but can be attacked if the key is weak, better to use Twofish or Threefish. Patent free. In public domain. Much faster than DES and IDEA but not as fast as RC4. Uses variable size keys of 32 to 448 bits. Considered secure. Designed for fast CPUs, now slower / old er CPUs.Blowfish is a block cipher.
  • Twofish – designed by Bruce Schneier and others as a successor to Blowfish. Was one of the finalists in the AES competition.Most CPUs now include hardware AES support making it very fast than Twofish.Patent free. In public domain.Uses keys of size 128, 192, or 256 bits. Designed to be more flexible than Blowfish (in terms of hardware requirements). Twofish is a block cipher.
  • Threefish – designed by Bruce Schneier and others.Threefish is a block cipher.
  • Serpent – designed by Ross Anderson, Eli Biham, and Lars Knudsen. Was one of the finalists in the AES competition. Patent free. In public domain. Has a more conservative approach to security than other AES competition finalists. Serpent is a block cipher.
  • MARS – designed by Don Coppersmith (who was involved in DES) and others at IBM. Was one of the finalists in the AES competition.
  • RC6 – Rivest Cipher 6 or Ron’s Code 6 – designed by Ron Rivest and others. Was one of the finalists in the AES competition. Proprietary algorithm. Patented by RSA Security.
  • RC5 is a predecessor of RC6. Other siblings include RC2 and RC4. RC5 and RC6 are block ciphers.
  • RC4 – Rivest Cipher 4, or Ron’s Code 4 – also known as ARC4 or ARCFOUR (Alleged RC4). Used to be an unpatented trade-secret for RSA Data Security Inc (RSADSI). Then someone posted the source code online, anonymously, and it got into the public domain. Very fast, but less studied than other algorithms. RC4 is good if the key is never reused. Then its considered secure by many. In practice RC4 is not recommended. TLS 1.1 and above forbid RC4 (also this RFC). CloudFlare recommends against it (check this blog post too). Microsoft recommends against it. Current recommendations overall are to use TLS 1.2 (which forbids RC4) and use AES-GCM. RC4 is a stream cipher. It’s the most widely used stream cipher. Recently block ciphers were found to have issues (e.g. BEAST, Lucky13) because of which RC4 rose in importance. Now such attacks are mitigated (use GCM mode for instance) and RC4 is strongly recommended against.

Asymmetric key algorithms (Public key cryptography)

Explanation:Each party has a private key (kept secret) and a public key (known to all). These are used in the following way:

Public keys are used for encrypting, Private keys are used for decrypting.

For example: to send something encrypted to a party use its public key and send the encrypted data. Since only that party has the corresponding private key, only that party can decrypt it. (No point encrypting it with your private key as anyone can then decrypt with your public key!)

Private keys are used for signing, Public keys are used for verifying.

For example: to digitally sign something, encrypt it with your private key (usually a hash is made and the hash encrypted). Anyone can decrypt this data (or decrypt the hash & data and perform a hash themselves to verify your hash and their hash match) and verify that since it was signed by your private key the data belongs to you.

These algorithms are usually used to digitally sign data and/ or exchange a secret key which can be used with a symmetric key algorithm to encrypt further data. They are often not used for encrypting the conversation either because they can’t (DSA, Diffie-Hellman) or because the yield is low and there are speed constraints (RSA). Most of these algorithms make use of hashing functions (see below) for internal purposes.

  • RSA – short for the surnames of its designers Ron Rivest, Adi Shamir and Leonard Adleman. Not used to encrypt data directly because of speed constraints and also because its yield is small (see this post for a good explanation; also this TechNet article). Usually RSA is used to share a secret key and then a symmetric key algorithm is used for the actual encryption. RSA can be used for digital signing but is slower. DSA (see below) is preferred. However, RSA signatures are faster to verify. To sign data a hash is made of it and the hash encrypted with the private key. (Note: RSA requires that a hash be made rather than encrypt the data itself). RSA does not require the use of any particular hash function. Public and Private keys are based on two large prime numbers which must be kept secret. RSA’s security is based on the fact that factorization of large integers is difficult. (The public and private keys are large integers which are derived from the two large prime numbers).
    • PKCS#1 is a standard for implementing the RSA algorithm. The RSA algorithm can be attacked if certain criteria are met so the PKCS#1 defines things such that these criteria are not met. See this post for more info. Was originally patented by the RSA but has since (circa 2000) expired. SSH v1 only uses RSA keys (for identity verification). RSA is supported by all versions of SSL/ TLS.
  • DSA – Digital Signature Algorithm – designed by the NSA as part of the Digital Signature Standard (DSS). Used for digital signing. Does not do encryption. (But implementations can do encryption using RSA or ElGamal encryption). DSA is fast at signing but slow at verifying. It mandates the use of SHA hashes when computing digital signatures. Unlike RSA which makes a hash of the data and then encrypts it to sign the message – and this data plus encrypted hash is what’s used to verify the signature – DSA has a different process. DSA generates a digital signature composed of two 160-bit numbers directly from the private key and a hash of the data to be signed. The corresponding public key can be used to verify the signature. The verifying is slow. A note about speed: DSA is faster at signing, slow at verifying. RSA is faster at verifying, slow at signing. The significance of this is different from what you may think. Signing can be used to sign data, it can also be used for authentication. For instance, when using SSH you sign some data with your private key and send to the server. The server verifies the signature and if it succeeds you are authenticated. In such a situation it doesn’t matter that DSA verification is slow because it usually happens on a powerful server. DSA signing, which happens on a relatively slower computer/ phone/ tablet is a much faster process and so less intensive on the processor. In such a scenario DSA is preferred! Remember: where the slow/ fast activity occurs also matters. DSA can be used only for signing. So DSA has to use something like Diffie-Hellman to generate another key for encrypting the conversation.

    This is a good thing as it allows for Perfect Forward Secrecy (PFS).

    • Forward Secrecy => the shared key used for encrypting conversation between two parties is not related to their public/ private key.
    • Perfect Forward Secrecy => in addition to the above, the shared keys are generated for each conversation and are independent of each other.

    Also, because DSA can be used only for digital signatures and not encryption, it is usually not subject to export or import restrictions. Therefore it can be used more widely. Patented but made available royalty free. DSA’s security is based on the discrete logarithm problem. SSH v2 can use RSA or DSA keys (for identity verification). It prefers DSA because RSA used to be patent protected. But now that the patents have expired RSA is supported.

  • ECDSA – Elliptic Curve DSA. Variant of DSA that uses Elliptic Curve Cryptography (ECC). DSA (and ECDSA) requires random numbers. If the random number generator is weak then the private key can be figured out from the traffic. See this blog post and RFC for good explanations.

    • ECC is based on Elliptic Curves theory and solving the “Elliptic Curve Discrete Logarithm Problem (ECDLP)” problem which is considered very hard to break. ECC keys are better than RSA & DSA keys in that the algorithm is harder to break. So not only are ECC keys more future proof, you can also use smaller length keys (for instance a 256-bit ECC key is as secure as a 3248-bit RSA key). Although the ECDLP is hard to solve, there are many attacks that can successfully break ECC if the curve chosen in the implementation if poor. For good ECC security one must use SafeCurves. For example Curve25519 by D.J. Bernstein. Used in Bitcoin and extensively in iOS for instance. Many web servers are adopting it too.
  • ElGamal – designed by Taher ElGamal. Used by GnuPG and recent versions of PGP. Taher ElGamal also designed the ElGamal signature, of which the DSA is a variant. ElGamal signature is not widely used but DSA is.
  • Diffie-Hellman (DH) – designed by Whitfield Diffie, Martin Hellman and Ralph Merkle. Does not do encryption or signing. It is only used for arriving at a shared key. Unlike RSA where a shared key is chosen by one of the parties and sent to the other via encryption, here the shared key is generated as part of the conversation – neither parties get to choose the key.

    Here’s how it works in brief: (1) the two parties agree upon a large prime number and a smaller number in public, (2) each party then picks a secret number (the private key) for itself and calculates another number (the public key) based on this secret number, the prime number, and the smaller number, (3) the public keys are shared to each other and using each others public key, the prime number, and the small number, each party can calculate the (same) shared key. The beauty of the math involved in this algorithm is that even though a snooper knows the prime number, the small number, and the two public keys, it still cannot deduce the private keys or the shared key! The two parties publicly derive a shared key such that no one snooping on their conversation can derive the key themselves.

    Has two versions:

    • A fixed/ static version (called “DH”) where all conversations use the same key,
    • An ephemeral version (called “EDH” (Ephermeral Diffie-Hellman) or “DHE” (Diffie-Hellman Ephemeral)) where every conversation has a different key.

    Its security too is based on the discrete logarithm problem (like DSA). SSHv2 uses DH as its key exchange protocol.

Hashing functions

Explanation:Hashing functions take input data and return a value (called a hash or digest). The input and message digest have a one-to-one mapping, such that given an input you get a unique digest and even a small change to the input will result in a different digest. Hashes are one way functions – given an input you can easily create a digest, but given a digest it is practically impossible to generate the input that created it.

  • MD2 – Message-Digest 2 – designed by Ron Rivest. Is optimized for 8-bit computers. Creates a digest of 128-bits. No longer considered secure but is still in use in Public Key Infrastructure (PKI) certificates but is being phased out.
  • MD4 – Message-Digest 4 – designed by Ron Rivest. Creates a digest of 128-bits. It is used to create NTLM password hashes in Windows NT, XP, Vista, and 7. MD4 is no longer recommended as there are attacks that can generate collisions (i.e. the same hash for different input).
  • MD5 – Message-Digest 5 – designed by Ron Rivest to replace MD4. As with MD4 it creates a digest of 128-bits. MD5 too is no longer recommended as vulnerabilities have been found in it and actively exploited.
  • MD6 – Message-Digest 6 – designed by Ron Rivest and others.
  • SHA 0 (a.k.a. SHA) – Secure Hash Algorithm 0 – designed by the NSA. Creates a 160-bit hash. Not widely used.
  • SHA-1 – Secure Hash Algorithm 1 – designed by the NSA. Creates a 160-bit hash. Is very similar to SHA-0 but corrects many alleged weaknesses. Is related to MD-4 too. Is very widely used but is not recommended as there are theoretical attacks on it that could become practical as technology improves.
  • SHA-2 is the new recommendation. Microsoft and Google will stop accepting certificates with SHA-1 hashes, for instance, from January 2017. SHA-2 – Secure Hash Algorithm 2 – designed by the NSA. Significantly different from SHA-1. Patented. But royalty free. SHA-2 defines a family of hash functions. There are theoretical attacks against SHA-2 but no practical ones.
    • Creates hashes of 224, 256, 384 or 512 bits. These variants are called SHA-224, SHA-256, SHA-384, SHA-512, SHA-512/224, and SHA-512/256.
    • SHA-256 and SHA-512 new hash functions. They are similar to each other. These are the popular functions of this family.
    • SHA-512 is supported by TrueCrypt.
    • SHA-256 is used by DKIM signing.
    • SHA-256 and SHA-512 are recommended for DNSSEC.
    • SHA-224 and SHA-384 are truncated versions of the above two.
    • SHA-512/224 and SHA-512/256 are also truncated versions of the above two with some other differences.
  • SHA-3 – Secure Hash Algorithm 3 – winner of the NIST hash function competition. Not meant to replace SHA-2 currently. The actual algorithm name is Keccak.

Some more hash functions are:

  • Whirlpool – designed by Vincent Rijmen (co-creator of AES) and Paulo S. L. M. Barreto. Patent free. In public domain. Creates a 512-digest. Supported by TrueCrypt.
  • RIPEMD – RACE Integrity Primitives Evaluation Message Digest . Based on the design principles of MD-4. Similar in performance to SHA-1. Not widely used however. Was designed in a the open academic community and meant to be an alternative to the NSA designed SHA-1 and SHA-2. Creates 128-bit hashes. There are many variants now: RIPEMD-128 creates 128-bit hashes (as the original RIPEMD hash), RIPEMD-160 creates 160-bit hashes, RIPEMD-256 creates 256-bit hashes, RIPEMD-320 creates 320-bit hashes.

Misc

  • PEM (Privacy Enhanced Mail) is the preferred format for storing private keys, digital certificates (the public key), and trusted Certificate Authorities (CAs). Supports storing multiple certificates (e.g. a certificate chain). If a chain is stored, then first certificate is the server certificate, next is issuer certificate, and so on. Last one can be self-signed or (of a root CA). The file begins with the line ----BEGIN CERTIFICATE---- and ends with the line ----END CERTIFICATE----. The data is in a text format. Private key files (i.e. private keys not stored in a keystore) must be in PKCS#5/PKCS#8 PEM format.
  • DER (Distinguished Encoding Rules) is another format. Can only contain one certificate. The data is in a binary format.
  • JKS (Java KeyStore) is the preferred format for key stores.
  • P7B (Public-Key Cryptography Standards #7 (PKCS #7)) is a format for storing digital certificates (no private keys) Supports storing multiple certificates. More about PKCS at WikiPedia. PKCS#7 is used to sign and/ or encrypt messages under a PKI. Also to disseminate certificates.
  • PFX/P12 (Public-Key Cryptography Standards #12 (PKCS #12)) is a format for storing private keys, digital certificates (the public key), and trusted CAs. PFX is a predecessor to PKCS#12. Usually protected with a password-based symmetric key.
  • CER is a format for storing a single digital certificate (no private keys) Base64-encoded or DER-encoded X.509 certificates.
  • SSL/TLS are protocols that use the above
  • SSL – Secure Sockets Layer; TLS – Transport Layer Security SSL has version 1.0 to 3.0. SSL version 3.1 became TLS 1.0. TLS has version 1.0 to 1.2. SSL and TLS are not interoperable (TLS 1.0 can have some of the newer features disabled, and hence security weakened, to make it interoperable with SSL 3.0) Used for authentication and encryption. Makes use of the ciphers above.